(More) MS Word Tips for Lawyers
Microsoft Word is an enormously powerful application and is used by lawyers and their teams every single day. The program has many “hidden” features that are especially useful for lawyers. Following are some hints and tricks for leveraging this powerful tool in your practice to speed up your work and streamline your efforts.
Custom Tabs/Groups in the Ribbon
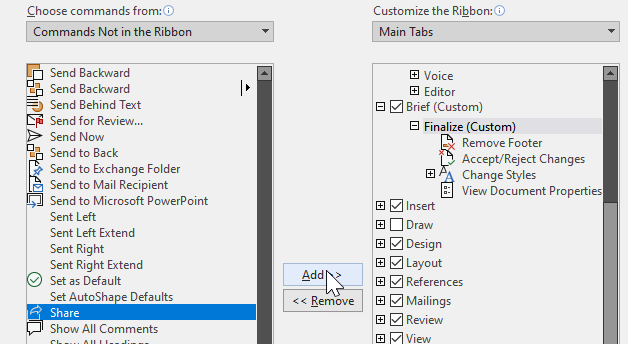 You can create your own custom tabs and groups in the MS Word Ribbon. In the Ribbon right click and select “Customize the Ribbon”. Then at the bottom of the dialog box click “New Tab” and give it a name. Then click “New Group” and give it a name. You can add multiple Groups in a Tab. Then on the left side choose the command you want to add, select it and click on the right arrow to add the command to your Groups. If you look at the top of the Commands pane you can switch from “Popular Commands” to “Commands Not in the Ribbon” from the drop-down menu. Choosing this option will reveal discrete functions that are often buried in contextual right click menus. For instance, you could create a “Brief” tab and add tools that you frequently use to format a brief. Or a “Finalize” tab and add functions like spell check, view document properties, accept all changes, etc.
QAT (Quick Access Toolbar)
If adding a new Tab seems over the top you can add a few frequently used functions to the Quick Access Toolbar (QAT). This toolbar appears either above or below the Ribbon and you can choose where you want it to appear. Click on the carat symbol in the QAT toolbar and select from popular commands like “New” or “Read Aloud” to have them appear in the toolbar. Options like “Paste and Keep Text Only”, “Insert Footnote”, or “Reveal Formatting” will put hard to find tools at your fingertips. Select “Email” to send a document via email in a single click. Click “More Commands” at the bottom of the “Customize the Quick Access Toolbar” to find some hidden gems by looking for Commands Not in the Ribbon. Or choose “All Commands” to add tools like Calculate. By adding Calculate you can select a formula you typed into a Word document and the Calculate button in the QAT toolbar will light up. Click it and look for results of the calculation to appear in the Status Bar at the bottom of the Word screen. No need to find a calculator!
Search
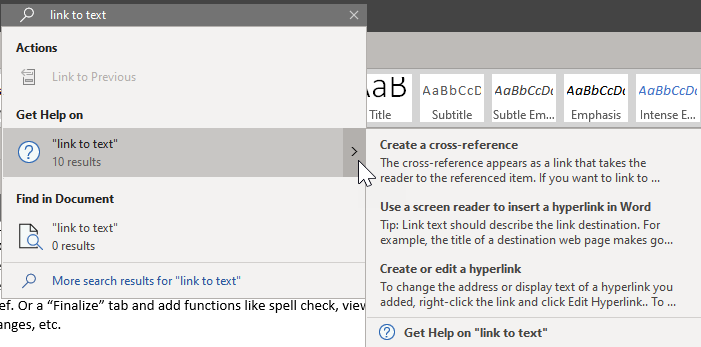 In Microsoft 365 the Search command in Word now appears at the top of the screen. Search helps you unearth commands as well as finding text on a page. For instance, type in “Table of Authorities” in the Search box and the search results show a link to the TOA commands, resources on how to use the TOA function, looks for the phrase in the document, and more. Or type in the name of someone in your firm and in one click send a copy of the document to her. Search also does a keyword search across your recently created files in OneDrive folders, so you jump right to another document.
Smart Lookup
Need to check to make sure that the word you just typed means what you think it means? Or do you need a synonym? Select the word or phrase in question, right click on it and choose “Smart Lookup” from the menu options. Smart Lookup uses the Bing search engine to find definitions and synonyms for the word you selected. You can also click on the drop down menu in the results to choose images if you want to spice up your document, or Files to search OneDrive for your keyword or Help to get instructions on how to use a feature in Word. The Smart Lookup results are contextual. If you select the word “footnotes” in your document the results you see will differ from those that you would see if you selected the word “onomatopoeia”.
Insert Graphics
 A recent update to MS 365 provides lots of free-for-commercial-use stock photography, icons and more to add interest to a Word document. Click on the Insert tab, then in the Illustrations group choose Pictures and then click on “Stock Images”. You can browse the images or search for images by keyword. If you are working on an article to share with potential clients, clients, or business partners you can spice it up with images. To make your document even more interesting to readers you can finalize it as a Sway interactive document by clicking on File – Transform. Sway will convert the document into an interactive storyboard to share from your website or via social media. When the document is converted to a Sway click Share – Anyone with the Link (and restrict editing). Sway is a tool that comes with Microsoft 365 that lets you take documents or slide decks and make them interactive online narratives.
Here is this blog post as a Sway display. Far more interesting than a PDF!
Lorem Ipsum and File Save as Template
If you are working on a template library to make quick work of generating heavily formatted custom templates for your firm there are a few tools that make this easy. One you probably know is to use the File – Save a Copy (in an existing file) or File – Save As (in a new document). Choose from options in the Save as Type dropdown menu including save as a template (.dotx) or macro-enabled template (.dotm). Save these files to your template library and when someone opens the file it opens a new editable document and renames the file to document1.docx – no more overwriting the template documents! If you want to build your template with filler language to make sure no one mistakes it for a real document, you can add Lorem Ipsum. This Latin phrase is used for placeholders. Type =lorem(p,l) into a document and replace the “p” with the number of paragraphs you want and replace the “l” with the number of sentences you need. You can also just include one number in the parentheses, and it will create that many paragraphs. When ready, place the cursor at the end of the equation and hit Enter to generate your text. For example:
Lorem ipsum dolor sit amet, consectetuer adipiscing elit. Maecenas porttitor congue massa. Fusce posuere, magna sed pulvinar ultricies, purus lectus malesuada libero, sit amet commodo magna eros quis urna.
Nunc viverra imperdiet enim. Fusce est. Vivamus a tellus.
Advanced Find
In the Find menu there is an Advanced Find option. If you need to find words in a document that are case sensitive, sounds like, or wildcards click on the carat next to Find in the Home Tab – Editing Group to reveal the Advanced Find menu. You can also search for formatting and special characters. For instance, you can replace all en dashes with an em dash by using Find and look for special characters and then click the Replace tab to make your replacements.
Navigation Pane
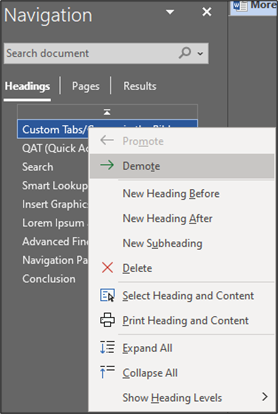 If you use Styles to help control formatting, generate Tables of Contents, and take command of your Word documents you should know about the Navigation Pane. Click on the View tab and in the Show group click on the box to select the Navigation Pane. You can then easily jump around the document based your header styles, move sections of the document by dragging and dropping the headers in the Navigation Pane (no more copy/paste) and use the right click menu to add new headings and subheadings or demote/promote existing headings.
Conclusion
There are so many tips and tricks to make your use of MS Word easier and less painful. The NCBA CPM At the Center blog has many, and check out free training from Microsoft, and tutorials from Office Watch and Legal Office Guru.