Turn Emails into Calendared Events in An Instant
If you use an electronic calendar, especially if you share that calendar with support staff or with clients via a booking link, you know that you need to keep it meticulously up to date. Many events on your calendar start life as an email. We will explore effortless ways to turn email messages into calendared events instantly to reduce mistakes and keep your calendar appropriately blocked.
Convert Email to Event/Appointment in MS Outlook
In the MS Outlook calendar, you can create a meeting with other participants, or you can add an appointment which blocks time on your calendar but doesn’t necessarily include others. Here are some ways to add either a meeting or appointment to your calendar with a very few clicks.
Outlook (installed)
In Outlook there are several ways to convert an email to a meeting or an appointment:
-
-
Click to Enlarge
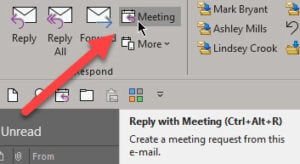
Reply with Meeting button – To convert an email to an event that retains all the information in the email, select the email from your inbox and click the “Reply with Meeting” button (Home Tab- Respond Group). This button sets up a meeting request to the sender and other recipients of the email with the meeting title taken from the email subject line and the entire text of the email appearing in the event notes. Simply edit the day, time, participants, and title as necessary and click send.
If you have a challenging time remembering where the Reply with Meeting button is (the button label only says “Meeting”) right click on it and add it to your Quick Access toolbar so it is easier to find and use! Note that the Quick Access toolbar is context sensitive so you may have to add the Reply with Meeting button in the Home view and the Message view.
-
In the Office 365 version of Outlook if you want to add any attachments from the email you are converting to an event you will need to take an extra step. As you are setting up the event information (date, time, location) click on the Insert tab and choose “Outlook item”. Then pick the original email to add it – and its attachments – to the event. In a perfect world you would have saved the attachment to a folder and you could insert it from there, but if you are just trying to triage your inbox and get your calendar blocked this is a quick and dirty way of adding any relevant attachments to the event. Outlook will remind you to add the location if you attempt to close the event without adding one. You can add an address, a video conference link (Zoom, Teams, Webex and more have add-ins for Outlook to add the link in a single click) or dial in and you won’t have to go back and add it later.
Be careful and remember this method (Reply with Meeting and inserting an email with attachments into an event) will include the body, subject and recipients of the original email so edit as necessary for confidentiality.
-
- Drag and Drop to Create an Appointment – You can drag and drop an email into the calendar icon in Outlook (bottom left corner) and it will set up an appointment. Simply adjust the time and day. Like the Reply with Meeting button, the text of the email will be included in the body of the appointment and the subject line will be converted to the appointment title. To add attachments from the original email, use the Insert – Insert Outlook Item as above. To make it a meeting click “Invite Attendees” in the event in your calendar.
- Create a Quick Step – Another option in MS Outlook is to add a custom QuickStep. Click on the tiny arrow symbol in the bottom right of the Quick Steps group in the Home tab. Choose New – Custom. Then name your Quick Step something like “Add to Calendar”. Click on “Add Action” and scroll to the Appointment options and choose “Create an appointment with attachment”. This will convert an email to an appointment and append the email – with its attachments – to the appointment. Edit the location, time, and title as necessary. Now you can move an email to your calendar with the original email attached in one click. Need it to be an event? Just click the “Invite Attendees.”
Outlook in the Browser
If you use MS 365 or have Outlook Web Access set up through a local or hosted Exchange server, you have similar options to convert emails to appointments or events when you use Outlook in a web browser.
In Outlook in the browser open an email you want to save as an appointment or event. Click on the ellipses on the far right of the message header. Then click on “Other Reply Actions” and then choose “Reply all by Meeting”. Adjust the meeting settings as necessary. If you want to make this an appointment instead of a meeting just remove the other participants.
Click to Enlarge
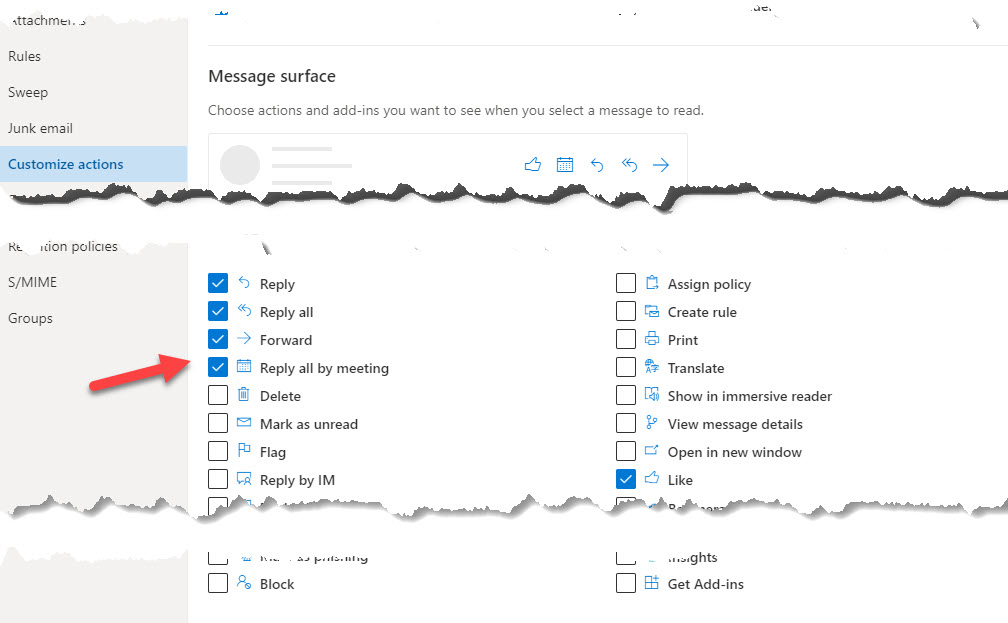
Too many clicks to get to “Reply All by Meeting”? Absolutely! Go into your Settings (the gear icon on the top right) and click “View All Outlook Settings”. Then in Mail settings choose Customize Actions and scroll down to the Message Surface options and check the box next to “Reply All by Meeting”. Now the Reply All by Meeting option will be at the top right of an open message next to the Reply, Reply All and Forward options. Don’t forget to save your changes. No more digging through menus!
Outlook App
The Outlook app for iOS and Android smartphones has a “convert to event” option when replying to an email or sending a new email. When you reply to an email look at the bottom of the screen and click on the small calendar icon. You can choose to “Send Availability” or “Convert to Event”. If the email has an attachment and you click on “Convert to Event” you will be warned that the attachment will be stripped off. Then your reply email will be set up as an event just like using the “Reply with Meeting” button in Outlook. Adjust times, recipients, etc. as necessary. Just like in the browser interface, if you just want to add the email to your calendar as an appointment instead of a meeting, remove the recipients.
Convert Email to Event/Appointment in Gmail
In the Browser
Click to Enlarge
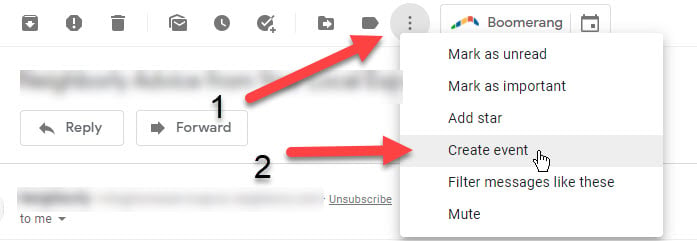
In Gmail you can add an email to your calendar either as an event or an appointment. Open the email you want to add as an event or appointment. Then in the toolbar at the top click on the vertical ellipses (aka the kebab menu, which indicates overflow options). Choose “Create Event”. This will add the email contents as an event in your Google Calendar, which you can edit as necessary. There is no easy option for transferring an attachment from the original email to the event. If you want to simply block time as a placeholder on your calendar (an appointment in Microsoft parlance) remove the Guests (except for yourself).
There are a few other ways to add Gmail to Google calendar, but none are particularly elegant.
In the App
There is no way to add an email directly as an event from the Gmail app on your smartphone to the Google calendar. You can toggle on “events from Gmail” in the Google Calendar app setting, but that will only automatically add events from your Gmail that appear to be for confirmations like flights, restaurant reservations, or other events. Handy? Yes! Intrusive? Yes! And, you have no real control.
Email to Event in Practice Management Application
Some practice management applications let you drag and drop information to the calendar. Many also have bi-directional synch with MS Outlook’s calendar so check if there is an integration or plugin available. Keep in mind this synchronization may break if you change your passwords so check that the functionality is working if you change passwords – it may not alert you.
Conclusion
Blocking and tackling your calendar is particularly important, whether to avoid missed deadlines or to keep from double booking your time. Take advantage of the functionality built into Outlook and Gmail to triage your inbox and your calendar at the same time.